Saturday, June 21, 2025

How to Publish an NFT on OpenSea: Step-by-Step Guide

📁 Prerequisites

ItemDescription
MetaMask WalletA crypto wallet to create and sign your NFT
ETH or MATICNeeded to pay gas fees (ETH for Ethereum; MATIC for Polygon — which is often free to mint)
NFT ContentYour digital asset (image, video, audio, 3D, etc.)

🛠️ How to Publish an NFT (on OpenSea)

✅ Step 1: Set up MetaMask Wallet

  1. Go to https://metamask.io and install the browser extension.

  2. Create a new wallet and save your recovery phrase securely.

  3. Add some ETH to your wallet (buy or transfer from an exchange like Coinbase or Binance).

⚠️ For Polygon (cheaper), you’ll need MATIC tokens and to switch your network in MetaMask.


✅ Step 2: Connect MetaMask to OpenSea

  1. Visit https://studio.opensea.io

  2. Click Profile (top right) → Choose MetaMask

  3. Approve connection in MetaMask — your OpenSea account is now tied to your wallet


✅ Step 3: Create a Collection (Optional)

  • Go to your profile → My Collections

  • Click Create a Collection

  • Add:

    • Logo

    • Description

    • Royalties (% you’ll earn on resales)

    • Blockchain (Ethereum or Polygon)


✅ Step 4: Mint (Publish) Your NFT

  1. Click Create (top menu)

  2. Upload your file (image, video, audio, or 3D model)

  3. Fill in:

    • Name

    • Description

    • External link (optional)

    • Properties, levels, unlockable content (optional)

    • Blockchain: Ethereum or Polygon

  4. Click Create — your NFT is now minted!

✅ On Polygon, this is free. On Ethereum, you may need to pay a one-time "initialize account" fee if it’s your first time.


✅ Step 5: List Your NFT for Sale

  1. Go to your newly minted NFT page

  2. Click Sell

  3. Set:

    • Price (fixed or timed auction)

    • Duration (e.g., 7 days)

  4. Click Complete Listing

  5. MetaMask will pop up → sign (and possibly pay gas fee if on Ethereum)


🎉 Done! Your NFT is Now Live on OpenSea

  • Share your NFT link on social media, Discord, or marketplaces

  • Buyers can now purchase it directly from OpenSea


🧠 Tips

TipWhy It Matters
Use Polygon for low feesNo gas fees to mint or list NFTs
Add royaltiesYou’ll earn % on every resale
Include unlockable contentUseful for private files, perks, etc.
Verify NFT visibilityMay take a few minutes to appear
==========================================================

Gasless Minting on Polygon (via Rarible or Mintable)

🧭 Why Polygon?

  • No gas fees (for minting, listing, or transferring)

  • Fast and low-cost transactions

  • Fully supported on OpenSea and Rarible


🔧 Option 1: Rarible on Polygon (Lazy Minting)

How to Mint:

  1. Go to Rarible.com

  2. Connect your wallet (e.g. MetaMask)

  3. Switch network to Polygon (you can use Rarible’s prompt)

  4. Click "Create"

  5. Choose Polygon as the blockchain

  6. Upload your file, add title/description

  7. Enable "Free minting" — this is Rarible’s version of lazy minting on Polygon

  8. Sign (gas-free) — your NFT will be visible on your Rarible profile

After Minting:

  • Your NFT is lazy minted, but still appears on-chain via Polygon metadata

  • You can list it on Rarible immediately

  • It will appear on OpenSea automatically after a short delay (indexed by wallet)


🔧 Option 2: Mintable (Gasless Store)

How to Mint:

  1. Visit mintable.app

  2. Create a "gasless store item"

  3. Upload your art and metadata

  4. Choose Gasless (Mintable Store) option — no crypto or gas needed

Notes:

  • NFTs minted via Mintable’s gasless store are minted off-chain until purchased (like lazy minting)

  • Once sold/minted, they can be transferred to OpenSea, but won’t show immediately unless manually imported


🌐 OpenSea on Polygon

  • OpenSea natively supports Polygon

  • Go to OpenSea, connect the same wallet

  • Switch network to Polygon

  • Your Rarible Polygon NFTs will show under “Collected”

  • You can list them for resale on OpenSea, zero gas


💡 Tips

  • Rarible lets you set royalties and collection metadata

  • You only pay gas if you mint on Ethereum — Polygon is gas-free for mint + list

  • No bridging required if you mint directly on Polygon


Tuesday, May 20, 2025

How To Hosting Google Sites on own Domain

Create your website at Google Sites - sites.google.com
When finished design, Publish first. The website is now working on sites.google.com.

To connect this website with your domain name which you purchased from a Domain Registrar, do the following:
On the webpage on sites.google.com/, click on the Settings (Gear) icon
On the Settings dialog, click Custom Domains, then click Connect Domain.


Type in the domain that you own already.
It will check the validity of the domain. If ok, proceed to next step.


If you see this message "This domain is not verified. Please verify your ownership", then click on the link, otherwise skip this section.


This section will prove to Google you own the domain, by creating an extra TXT/CNAME record.
A new dialog will show two options: Domain or URL Prefix
Select the Domain option.


On the dialog: Verify domain ownership via DNS record.
1. Select record type. TXT or CNAME. I choose CNAME because my domain registrar only has this option.
2. Sign in to your domain registrar (e.g. CrazyDomains)
3. Copy the CNAME record below into the DNS configuration. 
i) CName Label/Host: asuiasiaafa
ii)CName Destination / Target: aoanofzdof.googlehosted.com
These two values (masked above) will be given by Google.
4.Press verify below.

Reminder: steps  2 and 3 must be performed on the Domain Registrars page, before coming back here to click Verify. By placing the above information on your Domain Registrar, this shows you have control of the domain name, hence proving to Google that you own that domain.


Follow the instructions below to complete the procedure.

Google Sites will show these instructions:
################
Connect to third-party domain registrar
- In a separate tab, sign in to your domain registrar’s website
- Go to your DNS settings
- Create a new CNAME entry
- Under CNAME value or alias, enter www
- In CNAME destination, enter ghs.googlehosted.com
- Note: Your domain registrar might require a full stop at the end
- Save changes
- Come back to this tab and click Done
################

The next section shows the steps for CrazyDomains as the domain registrar. Others may be similar.


Saturday, February 08, 2025

Veed.io - An online Video Editing with AI-powered features

 Stumbled upon this online video editor platform while trying to condense video clips taken on my Google Pixel 7 Pro mobile phone. Few quick notes on some cool features that prompted me to share this experience here.

  • Video Compression includes fps and framesize
  • Free Account that is usable
  • Upload and Download that are smooth
  • Create videos by i) Recording ii) By Video AI (give a description and it produces a video)


Another reason that prompted this blog, is the rather un-intuitive layout and operations for the platform. But since it is quite a nice tool, I thought of giving more details here to make things easy for new users.

Video Editing Features:
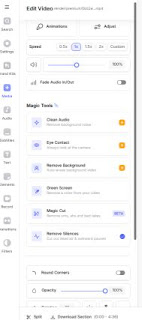
FPS - for compression, use this to select a lower framerate. Choices are: 30, 25, 24, 10
Framesize - reduces the image to popular social media formats, eg: 
Timeline, splitter, cutter - for slicing and dicing
Voiceover


Some not so cool features:
- you get two free, anonymous, non-sign-in video uploads and edit. Then you need to create an account to do more. You can choose the free plan.
- The interface for the first two free videos are different. Subsequent videos need to be restricted according to the type of plan.
- Free plan features: watermark (based on your name), no privacy (anyone with the link can view your video), 720p, 10min duration per video, 1 GB per video, 20GB storage total.

Hints (for using a Free account):
- Give a short name, even a dot "." - so that the watermark is shorter.
- Permanently Delete video from your account if you want privacy.

How to start?  Create New Project
Must do this before it allows you to upload a video, and access the editing tools.

How to GET Video when completed?
Done -> Export
You don't download when you finished creating, editing, compressing the video. You have to EXPORT first. But how to export? You have to click DONE button, since there is no Export button. Then only click Export Video. The export process is where the final video is rendered, using all the changes that we specified.


How to download?
The typical Download icon does NOT download the video. You need to click on one of the 3 buttons below: MP4 (for video) or MP3 or GIF


How to get back to main page, after export and download?
Once finished, and you want to upload or start creating a new video, there is NO back to Homepage or project button. It seems stuck at the download page. So you need to click the VEEP word on the top left corner.

How to NOT Share?
For the free account, all videos are SHARED, unless you Delete Permanently.
Sharing happens automatically after the Export process is finished.
Below dialog shows different ways of sharing. 
Although the video is public, people can't see it unless you give them the link. 


Friday, March 08, 2024

Linux On Microsoft Surface Laptop

 Found some materials on how to do this.

Firstly the YouTube link with title : How to Install Linux on a Microsoft Surface (Ubuntu 22.04 Linux Surface Kernel)

https://youtu.be/6_EHEmz_j4o


Few things needed:

  1. Linux Ubuntu Iso download
  2. USB key
  3. Software called Rufus
When the above are ready, then proceed
  • Run the Rufus program with the USB key plugged into the computer.
  • When prompted, select the Downloaded Ubuntu *.iso for Rufus. Basically Rufus will create a bootable USB with Ubuntu on it.
  • Plugin the USB onto the Surface
  • Boot up MS Surface, ensure boot configuration is selected to boot from USB drive.
  • Go into Ubuntu installation, follow instructions to install, then Reboot

At this point, Ubuntu is installed, you can boot and login. However, lots of the Surface hardware features are missing, e.g touchscreen, rotation of screen. To get these capabilities, we need to modify the Ubuntu kernel by installing a special kernal

Go to Google and search Surface Linux.
Follow the instructions there.


Update 30 Mar 2024

The following is an attempt to make use of a LIVE Linux on a USB drive. The above discussion is still slightly relevant, but several road-blocks are encountered as discussed below.
 
There are various good reviews of Rufus which states some of its advantages, so I won't repeat here. From experience, I can say it is easy to use to write a Linux ISO onto a USB drive and it seemed fast. However, specifically with Microsoft Surface that I tried on, it failed to get pass the Secure Boot (Bitlocker) screen. I changed the options at the MS Surface boot screen on the Security menu, trying all 3 options including no security, but still it would not boot. (Please leave comment, if I did not use correctly - but you must have experience in using Rufus on MS Surface).
Note: I've checked with the Microsoft account specifically to this MS Surface device, and there is no BitLocker key. Yet the device was still unusable.

So then I tried the UUI - and it is similarly as easy to write a Linux ISO to a USB drive than Rufus. This actually was able to go pass the Secure Boot. At the appropriate boot up screen, we should select VTOYEFI option, then followed by "Enroll_This_Key_In_MokManager.cer".

I chose SLAX because its ISO was under 500GB. After burning this into the USB using UUI, and starting up using the USB, it would not boot. The reason is that it appears UEFI is not fully available for some reason. Switching to Lbuntu instead, and using UUI, the USB was finally able to boot Lbuntu onto the MS Surface.

Now the next problem is that MS Surface Wi-Fi hardware may not have been supported by Lbuntu. So the next step is to find a Linux that supports MS Surface, at least for the Wi-Fi adapter.  

Wifi problem:
It seems that the Linux that I've tried, including Lbuntu and Ubuntu above does not recognize the wifi adapter hardware. From internet searches, it seems the hardware is Marvell branded wifi adapter. A few commands to check whether the wifi hardware adapter is detectable or not:
lspci
ip -a
It will be obvious if theses commands do not mention anything about any wifi adapters

Persistence
To consider persistence, that is keeping the changes made to the Live Linux, the overlayfs in Linux is used. A few good references include:


Thursday, October 12, 2023

Security


Hidden Cameras

https://us.norton.com/blog/how-to/how-to-find-hidden-cameras - an excellent list of methods to identify hidden cameras 


Will have more in this article ......

Tuesday, January 17, 2023

iRiver IBC-R6 Bone Conduction Earphone - Manual and Review

 Recently bought this bone conduction earphone from the mature company iRiver of South Korea. You may remember iRiver from the days of really portable MP3 players, recorders and such. It is priced in the mid-range of 65,000 to 70,000 Won. The reason I chose this over no-brand or unheard-of-brands which are less than half the price is because it is from a South Korean company, rather than China. There are more expensive ones of course, such as Aftershock, which has been rebranded as Shokz, but I cannot justify the price to myself.

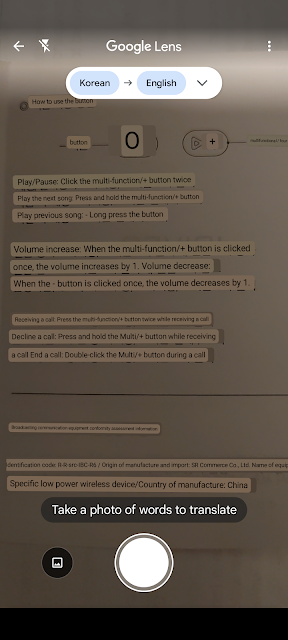
The first part of this blog would be showing the User Guide / Manual which is originally in Korean. The English translation (via Google Translate Camera function) is also shown below.


The review will be coming soon .... stay tuned


Saturday, April 09, 2022

Grand Mafia Strategy


Rules

City Rules

This can be found in: Event Centre -> Governor's War Season 2 -> Battle for The City Hall -> City Announcement -> Check Announcement


Mansions

Level 17 - Get Babe #3 Julia


Campaign 

Normal vs Elite - both have 7 stages.

Each Normal stage has to be completed first, then only the Elite stage can go to the same level of stages.


Elite #5-12 - Bubba - Need Sparrow, Vinny, Mike, Nurse Doxxy, Nioh

Elite #7-12 - Anonymous - Need Sparrow, Big Shot, Bubba, Lok, Nurse Doxxy


Defense

Wall 

This is one of the keys to defense against attackers. The higher the level, the better.
In general, go to Investment Center to upgrade various wall defence items.
Within the Wall, the Traps also need to be upgraded.
Enforcers can be selected as Defensive Enforcers within the Wall. Some Enforces are better than others, e.g. Sparrow, @nonymous, Tony, etc.
Radar - built this structure to ensure you get notified when others are attacking you.
Enforcers should return home (from Robbing or other activities), once you know (from the Radar notification) that you are under attack.

Safehouse

Keep Enforcers and Associates in Safehouse if Turf is under attack.

Police Raids

Enforcer - choose the one that is under the Wall category, e.g. Tony or El Cortardo. 
Gear up the Enforcer - maximise the biker gear.
Jewels - biker attack and biker defence, wall defence and trap attack
Crew Defense buff - enable this under the Combat buffs
Specialties - normal or Governor - should be all Biker and Crew Def/HP


Reinforce vs Station

Station - will be based on our stats. We can also station our Underboss on the other Turf, but if the battle is lost, then we will lose the UB too.
Reinforce - based on the stats of the other player.

Construction

Workshop

Workshop has links to Set, Armory, Jewels
Materials needed for workshop items can be obtained from Kingpins. Click on Item -> Upgrade -> Select Missing Material -> Method of obtaining

Buildings:
Wall <- Workshop <- Smelter 


Training vs Hospital vs Diamond Production


For miniH:
To train T4 bikers takes 6 days 18hr, 240,000 influence Hll events
Given that stats are:
2 training, 2 diamonds
total associates 1.993m
hourly upkeep 5.053m
training speed bonus 229.3%
training time -69.63%
associates/session 15,747
---
hospital capacity: 566/791,764  318.8%  566


Robbery

Clothing to increase speed: electric gun, builder's shirt/boots, investor's trouser/dagger
Clothing to increase load: investor's trouser/pistol, builder's shirt/shoes/shovel 

Robbing efficiency - Level 4 resources:
Arms. 1.26m x 14 PTS / 126min = 0.14 pts/min
Metal 0.945m x 14 pts/ 96. min = 0.138 pts/min
Depot 1.26m x 14 pts/ 140mi. = 0.126 pts/min
Diamond  0.4725 x25 pts / 82mins= 0.144 pts/min


Enforcers

Specialties increase: when Exp level of Underboss is increased.

Enforcers level up when: attacking kingpins, go on campaign

Troops increase
- by Enforcer Rank increase

Items

Where to acquire the items that we need?
Go to Faction Shop -> Faction Shop to buy with coins.
Go to Faction Shop -> Broker to buy with gold.

The items are categorised in:
Premium: Direct/Random Relocator


Kingpins

Experience
DMG      L1 L2         L3         L4
1        819 1431 2304 3973
2       1638 2862 4608 7946
3       2457 4293 6912 11919
4      3276 5724 9216 15892
5      4095 7155 11520 19865
Governor's War Specialties
DMG L1  L2         L3         L4
1        492  858         1382 2383
2        984  1716 2764 4766
3        1476  2574 4146 7149
4        1968  3432 5528 9532
5        2460  4290 6910 11915

Please excuse the numbers above if the format is jumbled up. The first column is the DMG levels reading downwards. Across the columns are the 4 different levels.
The Levels L1-L4 are the levels of the Kingpins
The DMG is in the game, where if we have enough Energy, we can hit a L1 Kingpin with DMGx2 or DMGx3 etc.

The main question the table above tries to answer is: Should I hit on a L4 OR using the similar energy to hit a L1 by using DMGx4?

The answer from the table is hitting a L1 with DMGx2 or DMGx3 is better than hitting a single (DMGx1) L2 or L3. However, if you can hit L4, then it is better to hit 1 L4 Kingpin (Exp=3973) than hitting an L1 Kingpin using DMGx4 (Exp=3276). 


Governor's War

Events Sequence

Day1 : Robbery
Day2 : Street Sweep / Police Station - Kingpins, Action points, Police Stations, family currency/insignia
Day3 : Increase Influence - enforcer wheel, family currency/insignia 
Day4 : Speed Ups
Day5 : Kill Event / Massacre Day


Battle

L5 Police Station - Bruiser Square
T3: Bruisers 1.140m Hitmen 1.169m Bikers 0.588m Cars 0.151m
Our Side: Hitman Square  UB: Bruiser Mike. Call for Bruisers.  
T3: Bruisers 1  Hitmen 1  Bikers Max Cars 0

Enemy has:
L5 Police Station - Bruiser Square
T3: Bruisers 1.064m Hitmen 1.144m Bikers 0.425m Cars 0.0m
Our Side: Bruisers Square  UB: Biker Bubba. Call for Bikers.  
T3: Bruisers Mine Max  Hitmen 0  Bikers Others Max Cars 0
good win