Sunday, February 01, 2015

Uninstall - Trend Micro Titanium Antivirus Security Suite

Uninstalling the Trend Micro Titanium Security suite has not been a pleasant experience for me. The usual techniques below don't work.

  1. Uninstall by going to "Programs and Features"
  2. Stopping Trend Micro services from the "Services". Even "Run As Administrator" would not allow the service to be stopped.

At the moment I have found a few useful links from other sites such as:
  • http://esupport.trendmicro.com.au/solution/en-us/1037161.aspx
  • http://esupport.trendmicro.com.au/solution/en-us/1058879.aspx
  • http://esupport.trendmicro.com/solution/en-US/1059018.aspx
  • http://forums.cnet.com/7723-6132_102-552546/trend-micro-security-won-t-uninstall/
One trick that seemed to work, thanks to the links above, is go to the START button on Windows (sorry Windows 8), 
- look under All Programs 
- look for Trend Micro folder
- go to something like More Tools and Help
- look for something like: Trend Micro Diagnostic Toolkit - run this.


Group Feature selection -a Binary Way


Suppose there are T distinct types and each of these types is labelled as 1,2,3,4,....,T. Let any of these types be represented as t.
And suppose we want to have various groups and each group is a combination of types. There are G groups in total and each of these groups can be labelled as g = 1,2,3,....G.

Each group can be composed of types as the following example:
g=1 has types  {2,3}
g=2 has types {1,2,3}
g=3 has types {1,2}

Then suppose that for each group g, it is required to randomly select a type which belong to the group.
Here is a method that is designed to be general and although may not be the the most efficient, should be efficient enough for small T.
The types are represented as binary as follows. Example with T=3
t=1 -> 001
t=2 -> 010
t=3 -> 100

The groups can be represented by combining the binary representation for the types. So using the example of the groups above, if g=1 has types {2,3}, then the group is the binary sum of the types:
   g=1 -> 010 +100 = 110
   g=2 -> 001 + 010 +100 = 111
   g=3 -> 001 + 010 = 011

Now for a particular group, it is required to select types which belong to that group. However for general efficiency, it is desired NOT to distinguish between any groups while selecting the random types. So there will be some wastage in this procedure, but it should be fast.

So here is the general random selection process to select any type t from 1....T. Let r be a random integer number from 1....T. Construct a binary representation of the random number, such that:  b=2^(r-1).
The table below shows the representation for various random numbers:
r=1: b=0 -> 001
r=2: b=1 -> 010
r=3: b=2 -> 100

To apply the random selection, simply apply the AND operator on r and g. So using the example of g=1->110, the combination with each of the random numbers would yield the following:
g->110 AND r->001 => 000 no type is selected
g->110 AND r->010 => 010 type 2 is selected
g->110 AND r->100 => 100 type 3 is selected

This algorithm can of course be made more efficient, but that is left for another bright person to accomplish. The present algorithm is efficient already due to use of simple random integers and binary operations and avoiding the use of decision logic like if-else.

Monday, January 26, 2015

Where to get free graphics

Graphics or pictures or images are very useful when we want to illustrate something on our webpages, blogs or other work. It is very easy, but sometimes not right to simply search for images on the internet and use them without permission. There are however, places on the internet that allow pictures to be used for free.

The aim of this post is to put up a list of sites that allow users to use the images for free.
1. Pixabay.com
2. Images under Creative Commons licence.

Friday, January 16, 2015

How to Check for Spyware, Malware Infection

This article will present various ways to check whether your PC is infected by malware, virus and other nasties. Firstly, here is a recollection of other related posts in this blog, so I will show the link here instead of writing the same material again. The new material will be after that.

How to Check for Botnets

Security - Protection against Botnets

Windows Server 2008 - Firewall, Antivirus, AntiSpyware

Security Software Review, Discounts and Special Deals

Links to Smartphone Mobile Security Software

Malware: Windows Enterprise Defender and Windows Diagnostics

Online Scan - PC tools

Online Scan - Websites

Online Scanning websites and links for virus, malware, spyware

Online Scan - AntiVirus

Now for some new stuff. Some tools that can be downloaded and used are:


Google and download: TDSSKiller
- Start tdsskiller - Run as Administrator.
- Click on Change parameters.
- Check all options except "Loaded modules" and click OK.
- Then click on Start scan.
- When threats are found, choose the Skip option for all of them, instead of deleting.
- To open the log file, click on Report. Or it can be found in :\TDSSKiller.<version_date_time>_log.txt


Google and download: Farbar Recovery Scan Tool.
- Start FRST - Run as Administator.
- Select the option Addition.txt as well as others selected by default. Press the Scan button.
- FRST will create two logs - FRST.txt and Addition.txt - in the same directory the tool was run from.

Some list of tools and other advice can be found on:
https://www.makeuseof.com/tag/download-operation-cleanup-complete-malware-removal-guide/

Monday, January 12, 2015

How To Uninstall Pokemon Trading Card Game

The Pokemon Trading Card Game, is not so easily removed.

It may happen that your beloved one installed this Pokemon Trading Card Game without your awareness. The first thing any Windows user would do nowadays would be to go to the:
Control Panel -> Programs and Features -> Uninstall -> Pokemon Trading Card Game.
..... or something similar depending on the version of Windows XP/Vista/7/8/etc

Error: a ''property.USER_profile'' error

However, some may encounter an error message above during uninstallation. There are several options.


Two of the recommended tools are:

Revo Uninstaller
CCleaner
See http://xtechnotes.blogspot.com.au/2011/07/links-to-free-software.html for the above and similar tools


The way without using any software is the following.
1. Go to Control Panel -> Programs and Features
2. Scroll down the list of programs until Pokemon Trading Card Game is found.
3. Do not click the uninstall button above. Instead at the line item that says "Pokemon Trading Card Game", right-click and then choose Change or Repair something similar.
4. Then when a Window pop-up, click on the Uninstall button.
5. This uninstall should complete properly. If not, check out the software mentioned above. The other alternative is to boot into Windows Safe Mode and uninstall there.


Saturday, January 03, 2015

Migrating WordPress Blog

This post is also posted at http://travel4work.wordpress.com/
Migrating WordPress from <yoursite>.wordpress.com – which is a free service – to another site that you are paying for such as <yourdomain>.com/<yourNewWordPressHome> is very easy and it is all done through WordPress.
In this situation, my new website has Fantastico and it allow WordPress to be installed on my domain very easily – few clicks of buttons. Now assume both <yoursite>.wordpress.com and <yourdomain>.com/<yourNewWordPressHome> are running, here are the instructions.
1. Go to <yoursite>.wordpress.com and login there.
2. Go to the classic Dashboard.
3. On the left panel, go to Tools – Export.
4. Choose to export “All Content” and when asked, save the XML file to your PC.
This XML file presumably contains all the data for the two WordPress to communicate.
There are lots of pictures in my original WordPress site, but the XML file is only over 100kB, so obviously the Contents are not being saved, ie not needed.
1. Now go to the new <yourdomain>.com/<yourNewWordPressHome> site and login.
2. 2. Go to the classic Dashboard.
3. On the left panel, go to Tools – Import.
4. At the Import page, choose the WordPress option, and you will be asked to install the plugin called WordPress Installer. Go through with this.
5. Then click on Activate Plugin and Run Importer.
6. Click the button to choose the XML file to import from.
7. In the Import WordPress page, choose Import Author and “Download and import file attachments”.
8. You can now go back to the original site and just manually check the old settings, and apply the same settings to the new website. Some example of this to consider are:
a) Appearance – Themes – search for the same previous theme using the search bar and install
b) Appearance – Widgets – Text – Add your text, including Google Adsense code.


Monday, December 01, 2014

Links to Discounted Software - up to 100%

This post is about Retail Software that are discounted. Some of these software are 100% discounted meaning the are totally FREE.

There is another post about  software which are always free, including freeware at:
http://xtechnotes.blogspot.com.au/2011/07/links-to-free-software.html
This post here, will not include freeware which is on the link above.

There are also other websites where you can get coupons such as:
BitsDuJour - http://www.bitsdujour.com/
RetailMeNot - http://www.retailmenot.com/
Again, this post here is not about that.

So what is this page about?
The software here are Retail software - meaning they are being sold. But for various reasons, there are opportunities to get them at no cost. So here they are:


Free WinX HD Video Converter Deluxe – 100% Discount
$49.95 Free!


Free WinX DVD Copy Pro – 100% Discount
https://www.howbigdeal.com/h/winx-dvd-copy-pro-freebie/


Saturday, September 27, 2014

Hidden Windows Devices


Some USB devices which have been unplugged or not active cannot be seen via Windows' Device Manager. However the following command will make Windows show the Hidden Devices. Open a CMD terminal, and enter the two lines:
- set devmgr_show_nopresent_devices=1
- start devmgmt.msc

Removing Rogueware

Sometimes rogueware such as search toolbars or other utility kits are sneakily installed on your PC when you install other big reputed programs. They may not be officially bad, but just annoying and you did not intend to have them in the first place. So here are some steps to remove them.

- create restore point
- Use the following tools to scan and remove rogueware
AdwCleaner (www.bleepingcomputer.com/download/adwcleaner) to run scan
Junkware Removal Tool (www.bleepingcomputer.com/download/junkware-removal-tool) and run scan.
RogueKiller (www.bleepingcomputer.com/download/roguekiller) and run scan

Monday, June 16, 2014

Building PC - AMD A8-6600K

March 2014

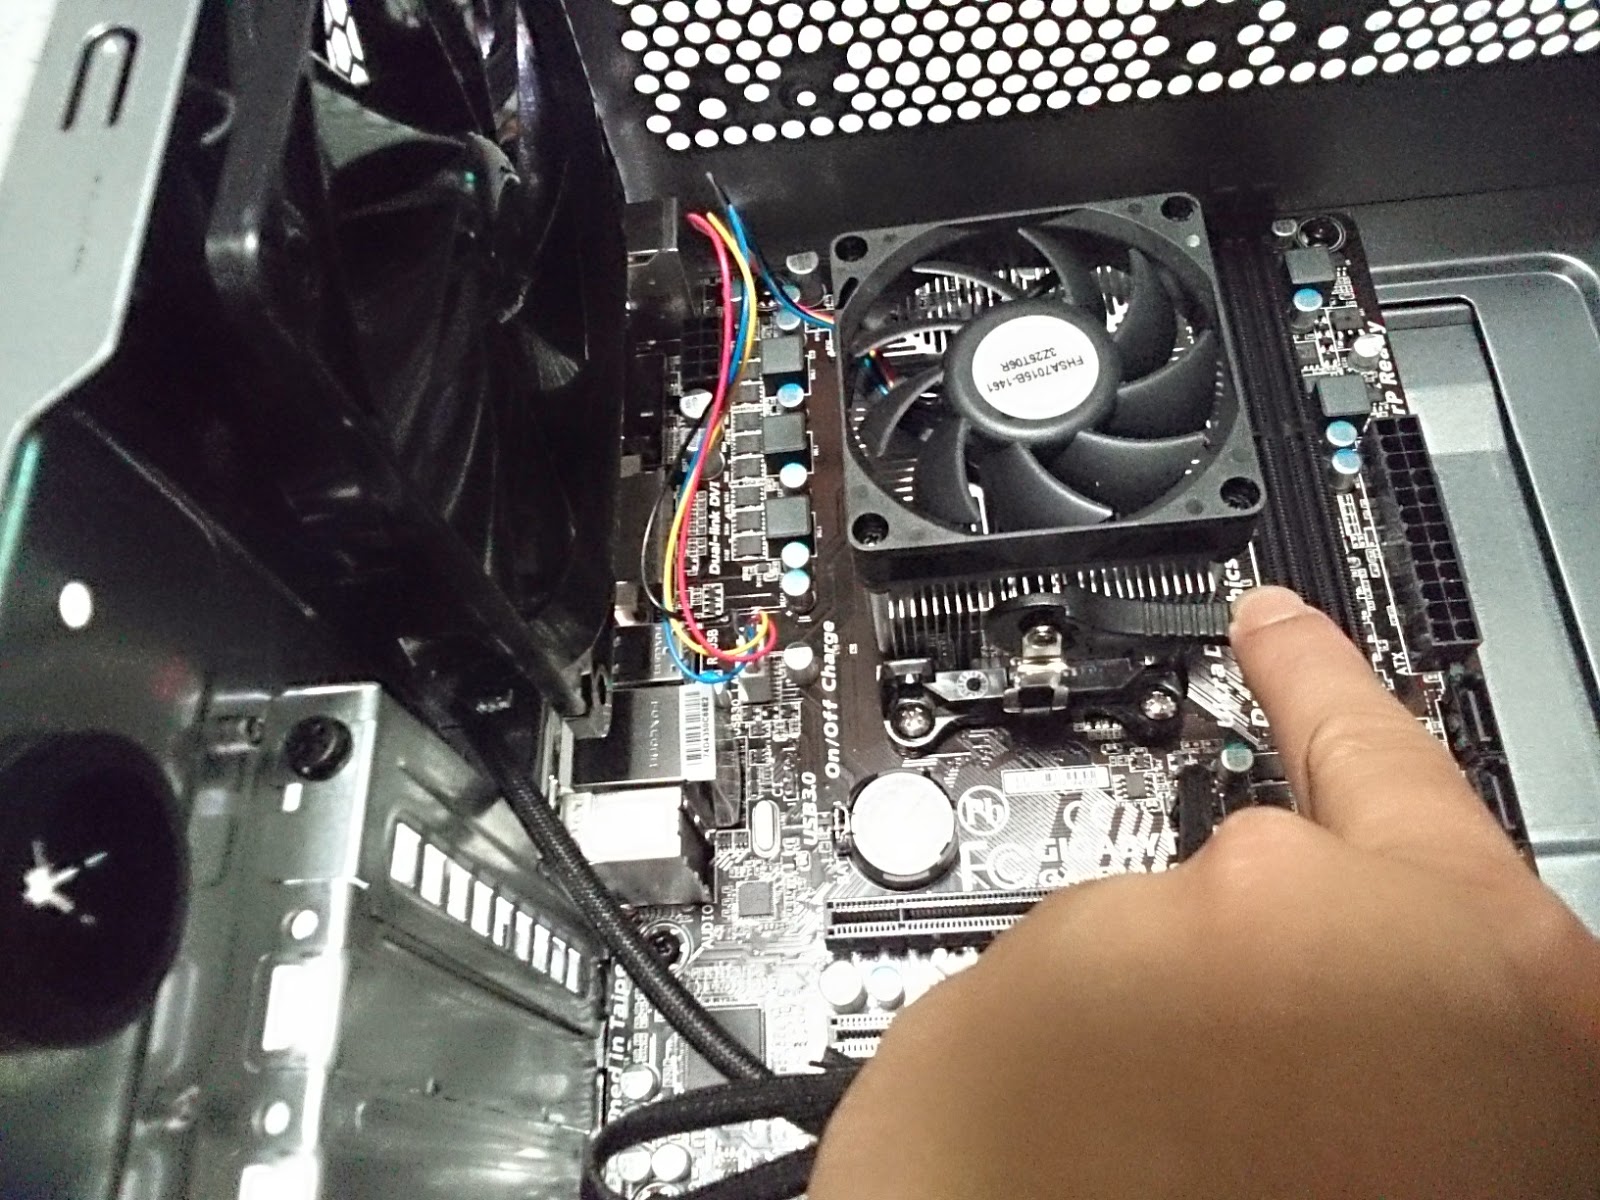
Here are some photos taken of the recently build PC. It was meant to be a detailed instructions with pictures on how to build your own PC. Unfortunately after the first few steps, the PC building process was more exciting than taking pictures such that I've forgotten to take photos of the later steps.

In any case, from previous building experience, it is the first few steps which are crucial in building the PC.
This illustration would be very similar for most desktop systems.

The system is an extremely budget system.
APU:  AMD A8-6600K  Quad Core, 4.2GHz Max Turbo, 3.9GHz Base, Black Edition
Mobo: Gigabyte GA-F2A88XM-DS2, A88XFM2+, 2xDDR3/PCI-E/SATA3/USB3.0/DVI-D/D-SUB/RAID/mATX
RAM:  Kingston HyperX 16GB (2x8GB) DDR3
HDD:  Western Digital 3.5"Green2TB WD20EZRX, 64M SATA3
Case:   ThermaltakeVO650B1W3A, Versa-I, USB3.0, TowerCase, 500W PSU

All other parts such as DVD-RW, Wireless Adapter, LCD Monitor, Keyboard, Mouse, etc are recycled from the previous system.

1. Where to Screw down the Motherboard.
Previous PC building exercise almost ran into serious trouble when I used the wrong screws for screwing in the base of the Case to the Motherboard.

There is actually a Base Screw, shown in the photo, that needs to screw to the case, then letting the motherboard sit on top of these screws. So this type of screw between the case and the underneath of the motherboard, prevents the two from touching, to avoid a short-circuit

2. Check out exactly where the Back Panel of the case, need to correspond to the Connectors part of the motherboard.


3. Now start by screwing in the Motherboard to the Case. Ensure that the Motherboard is sitting properly on the Base Screws and not touching the Base Case directly.


4. Here is a view of the CPU, just before it is put into the slot. Many Motherboards are designed such that the CPUs will slot into the holes in only one way. So if the CPU does not slot gently into the Motherboard, never apply force on it - otherwise the pins can be damaged.
Once the CPU has dropped into the pin slots, then push down and latch the silver bar.


5. Once the CPU has been attached, the next part would be the Heatsink and Fan, which sits on top of the CPU. Before actually clipping the Heatsink, place it in the right position, and feel the latch to check how it is supposed to go. Play with it first to see how flexible it is, before actually fitting it in.


6. The CPU installation was done first so that the other parts can be installed around it.
Plug all necessary cables from the Case to the Motherboard. This could be fan or drive cabling.


7. Next install the RAM. The modern motherboard has a simple mechanism for installing RAM. Ensure the RAM is the right side, push the RAM slowly into its slot until the latch is activated by the click sound.


8. The other main components were installed, unfortunately with no photos.
So a quick summary of the subsequent steps are:
- install Hard Drive with SATA connectors.
- install DVD-RW optical drives.
- install network adapter


Saturday, April 12, 2014

What is and what to do about Heartbleed

Heartbleed has been all over the internet. Everyone who knows IT should have heard about it. In fact this is so serious that your grandmother should hear about it if she does online banking.

Instead of writing more on this subject, here is a collection of links on the Heartbleed story, with different focus.

One important thing though, the heartbleed bug is such that some when you login to some websites or web services, your passwords are exposed. However, if those sites have not fixed the bug, then changing your password would mean that the new passwords are also revealed.


Some write-ups on heartbleed from regular news organizations
ABC Australia - http://www.abc.net.au/worldtoday/content/2014/s3982491.htm
Forbes - http://www.forbes.com/sites/josephsteinberg/2014/04/10/massive-internet-security-vulnerability-you-are-at-risk-what-you-need-to-do/


The technical details of the Heartbleed flaw and a solution
http://www.gizmodo.com.au/2014/04/how-heartbleed-works-the-code-behind-the-internets-security-nightmare/

Don't change all your passwords
http://www.crn.com.au/News/382523,heartbleed-dont-change-all-your-passwords.aspx

10 passwords that should be changed
http://www.crn.com.au/News/382519,heartbleed-10-passwords-you-need-to-change-right-now.aspx

Extensive list of organizations on what passwords should be changed
http://mashable.com/2014/04/09/heartbleed-bug-websites-affected/


Tools that test if a URL/website is affected:
http://filippo.io/Heartbleed/

Instead of going to the above website, you can type the name of the website directly into the URL box like:
      http://filippo.io/Heartbleed/#<URL>
where <URL> should be replaced by the website name such as www.example.com


Sunday, April 06, 2014

How to use hotel wifi safely


The links below are to a few articles about how to use FREE hotel wifi safely. In summary:
1. There is no real safe way to use hotel wifi - Be Warned
2. Using the hotel LAN (not wifi) is even worse
3. Using VPN provides a layer of protection since it hides the data transmitted from your device to the internet. However it still doesn't prevent a trojan from being planted on your system and accessing your file system.


http://us.norton.com/yoursecurityresource/detail.jsp?aid=free_wifi


http://traveltips.usatoday.com/safely-use-wireless-internet-hotels-2970.html


http://www.wikihow.com/Stay-Safe-While-Using-Hotel-WiFi


http://blog.hotspotshield.com/2013/06/17/hotel-wifi-security/


http://forums.cnet.com/7723-6132_102-565662/how-can-i-use-free-wifi-in-hotel-safely/

Sunday, February 16, 2014

Notes Android - How To Conserve Mobile Data

This note applies to Android mobile phones, smartphones, tablets, phablets. Other non-Android devices may have something similar.


Check and limit your data usage
- tap Settings - Data usage.
From this screen you can do many things like:
- Mobile Data - can switch this off.
- Set mobile data limit - check this option to enable the following settings:
--- Data usage cycle - use this to define your own cycle to correspond to your billing cycle.
--- Set your own Warning and Limit of how much data you can use.
--- Restrict using Mobile data for individuals apps.

Use wifi where possible, especially when downloading apps, upgrading apps, listening to music, watching YouTube and any other data intensive tasks.

Reducing data usage when doing the internet. For example some browsers compresses html data, images and uses proxy servers.
- In opera Mobile Browser, choose the Off-Road mode.
- In Chrome Browser, goto Settings, Bandwidth Management, Reduce Data Usage.

Music players like Spotify, lets you choose a lower streaming rate or use offline playlist.

Android apps can disable syncing while Play Store apps can be chosen to not update automatically.

Sunday, February 09, 2014

Notes Android - How to handwrite / take notes in Chinese

This instruction is written based on experience using the following phablet:
- Sony Xperia Z Ultra
- Android 4.3
However, the instructions may also work for similar Android smartphones.

This note will show how to use the phablet to take notes in:
English - via keyboard,
English - via hand write
Chinese - via keyboard
Chinese - via hand write

Prerequisite apps:
Google Keep - this is a note taking app which is quite flexible. Users may choose other editors.

Change Language Settings:
- Go to Settings on Android.
- Under Personal, tap "Language & Input"
- Under "Keyboard & Input Methods", tap Default
- A window pops up with the following choices.
----- For international Xperia keyboard
----- Xperia Chinese Keyboard (Choose this if you want Chinese)
----- International Keyboard   (Default, for English)

Using English Keyboard or Handwrite
- Open up Google Keep or another notepad-like editor app.
- Start writing the note and activate the keyboard.
- WARNING: to write in English, the "Xperia Chinese Keyboard" also has an English option but don't use this. Instead, for English, choose "International Keyboard" in the Language settings section above.
- Look at the keys at the botton row, and find the key marked "EN" for English or "CN" for Chinese.
- Toggle this buttion to get "EN" for English, if it is not EN already.
- Tap and hold the EN key for a few seconds, to switch between Keyboard mode or hand-writing mode.

Using Chinese Keyboard or Handwrite
- Open up Google Keep or another notepad-like editor app.
- Start writing the note and activate the keyboard.
- WARNING: to write in Chinese, the "Xperia Chinese Keyboard" must be chosen in the Language settings section above.
- Look at the keys at the botton row, and find the key marked "EN" for English or "CN" for Chinese.
- Toggle this buttion to get "CN" for Chinese, if it is not CN already.
- Tap and hold the CN key for a few seconds, to switch between Keyboard mode or hand-writing mode. The options given could be "Stroke", "Handwriting", "Pinyin".

Tricky important note is that, once in a chosen language already, changing from stroke to hand-writing requires tapping and holding on the language button, eg "EN". Different models may have different option names for handwriting or using keyboard.


Sunday, February 02, 2014

Notes Android Directory Structure

This post is about the native directory folder structure of Android. This means for a phone, tablet, phablet, smartphone, etc which runs a modern Android OS (current latest is 4.4), their internal directory folder structure is the topic of this post.

The way to see the directory is to use various apps such as "File Manager", "File Commander" or other similar applications. This post aims to describe the common folder structure so it is easy to find things when we know it.

When new apps are installed, many would have their own folder created under the top level directory. Besides apps, there will be an existing number of folders following a new installation of Android.


The directory / folder structure is like:

Alarms
amazon ------------- your own app
Android
-- data
-- obb
..........
burstlyImageCache
burstlyVideoCache
DCIM --------------- images taken with camera usually goes here by default
-- .thumbnails
-- 100ANDRO
-- Camera
Download ----------- downloaded files usually go here by default
kindle ------------- your own app
Music
Movies
Notifications
Pictures
Podcasts
Ringtones
whatsapp------------- your own app

Examples of a few apps shown are: amazon, kindle, whatsapp

Friday, December 13, 2013

LCD, LED Panel Technologies - TN, IPS, MVA

A few sites that explain the differences between various LCD/LED panel technologies such as:
TN, IPS, MVA.

http://www.tftcentral.co.uk/articles/panel_technologies.htm
Panel Technologies

http://apcmag.com/Content.aspx?id=7923
What to look for in a monitor: MVA panels explained


Thursday, October 17, 2013

Notes VI

 List of Commands for vi - An Unix Editor

Complete Documentation
Undo Command
Screen Commands
Cursor Positioning Commands
Search Commands
Text Insertion Commands
Text Deletion Commands
Changing Text
Search and Replace
Cutting and Pasting Text
File Commands


Complete Documentation
The vi editor is a common editor for unix systems in that it makes use of a regular keyboard with an escape key. On the DECstation, the escape key is the F11 key. It therefore works on all unix computers. Complete documentation is available by typing

man vi  at the unix prompt.


Undo Command
u                    undo the last command.

Screen Commands
CTL/l Reprints current screen.
CTL/Y Exposes one more line at top of screen.
CTL/E Exposes one more line at bottom of screen.
CTL/F Pages forward one screen.
CTL/B Pages back one screen.
CTL/D Pages down half screen.
CTL/U Pages up half screen.
H     Go to first line on screen
M     Go to middle line on screen
L     Go to last line on screen
nH    Go to line n beneath top of screen
nL    Go to line n above bottom of screen
nG    Go to line n
:n    Go to line n


Cursor Positioning Commands
j      Moves cursor down one line, same column.
k      Moves cursor up one line, same column.
h      Moves cursor back one character.
l      Moves cursor forward one character.
RET    Moves cursor to beginning of next line.

0      Moves cursor to beginning of current line.
^      Moves cursor to beginning of first non-blank character of current line.
$      Moves cursor to end of current line.
+      Moves to next line, first non blank character
-      Moves to previous line, first non blank character
SPACE  Moves cursor forward one character.
nG     Moves cursor to beginning of line n. Default is last line of file.
0      Moves the cursor to the first character of the line.
:n     Moves cursor to beginning of line n.
b      Moves the cursor backward to the beginning of this or previous word.
B      Moves the cursor backward to the beginning of this or previous word, ignoring symbols.
e      Moves cursor to end of this or next word.
w      Moves cursor to beginning of this or next word.
E      Moves cursor to end of this or next word, ignore any symbols.
W      Moves cursor to beginning of this or next word, ignore any symbols.
(      Moves to beginning of current or previous sentence
)      Moves to end of current or next sentence
{      Moves to beginning of current or previous paragraph
}      Moves to end of current or next paragraph

Search Commands
/pattern  Moves cursor forward to next occurrence of pattern.
?pattern  Moves cursor backward to next occurrence of pattern.
/, n      Move to next search
?, N      Move to previous search
.         Search wildcard - any single character
*         Search wildcard - zero or more characters
^         Search wildcard - beginning of line
$         Search wildcard - end of line
[...]     Search wildcard - any character in bracket, [xyz] means x or y or z
[..-..]   Search wildcard - any character in range, [a-z] means anything from a to z


Text Insertion Commands
a    Appends text after cursor. Terminated by escape key.
A    Appends text at the end of the line. Terminated the escape key.
i    Inserts text before cursor. Terminated by the escape key.
I    Inserts text at the beginning of the line. Terminated by the escape key.
o    Opens new line below the current line for text insertion. Terminated by the escape key.
O    Opens new line above the current line for text insertion. Terminated by the escape key.
DEL  Overwrites last character during text insertion.
ESC  Stops text insertion. The escape key on the DECstations is the F11 key.

Text Deletion Commands
x     Deletes current character.
X     Delete character before cursor.
6x    Delete next 6 characters
4dd   Delete the next 4 lines
dd    Deletes current line.
dw    Deletes the current word.
d)    Deletes the rest of the current sentence.
d}    Deletes the rest of the current paragraph.
D, d$ Deletes from cursor to end of line.
d0    Deletes from cursor to beginning of line
3dw   Deletes next 3 words
3dl   Delete next 3 letters
P     Puts back text from the previous delete.

Changing Text
cw          Changes characters of current word until stopped with escape key.
c$          Changes text up to the end of the line.
C, cc       Changes remaining text on current line until stopped by pressing the escape key.
c^          Change text to beginning of line
c)          Change text to beginning of sentence  
c}          Change text to beginning of paragraph
3cw         Change next 3 words
~           Changes case of current character.
xp          Transposes (swap) current and following characters.
J           Joins current line with next line.
s           Deletes the current character and goes into the insertion mode.
rx          Replaces current character with x.
R           Replaces the following characters until terminated with the escape key.


Search and Replace
:s/old/new          Replaces old with new
:s/old/new/g        Replaces old with new all occurrances
:s/old/new/c        Replaces old with new - need confirmation
:11,l2 s/old/new    Replaces old with new, within range of line l1 and l2


Copy(yank) and Paste Commands
yy      Copy line to buffer. Does not delete the line from its current position.
yw      Copy (to buffer) to the end of word
y0      Copy from the beginning of line
y$, Y   Copy to the end of line
y)      Copy to the end of sentence
y}      Copy to the end of paragraph
p       Places buffer after the current position of the cursor.
P       Places buffer before the current position of the cursor.


File Commands
vi filename     where filename is the name of the file to be edited.
vi -rfilename   recover file in case of crash
vi +/blah file  open file "file" at the point in the file containing text "blah"
:R file         Inserts the file filename where the cursor was before the ``:'' was typed.
:w file         Save current file as a new file with name "file"
:l1,l2w file    Save from line 11 to line l2 in file called "file"
:.,$w file      Save from current line "." to last line "$" of file
ZZ              Exits vi and saves changes.
:wq             Writes changes to current file and quits edit session.
:q!             Quits edit session (no changes made).
:e              reverts back to last saved mode.

Notes Networking


Contents
========
inetd
socket.h
Setup Linux Network
Network VM with Virtual Box - Bridged, Internal, Host-Only


inetd
========
inetd - maintains passive sockets on a variety of these well-known ports. When a new connection is created, Inetd starts a program to handle the connection, based upon a configuration table. This way, one program can handle incoming connections for a variety of services. Inetd only runs server programs as they are needed, and will spawn multiple server programs to service multiple network connections. Inetd works best for network services with fairly long duration, so the extra startup overhead becomes negligible.

inetd services - echo, discard, daytime, chargen, time
- Usage: eg. telnet <IP> echo


socket.h
=========
#include <sys/socket.h>
int     accept(int socket, struct sockaddr *address, socklen_t *address_len);
int     bind(int socket, const struct sockaddr *address, socklen_t address_len);
int     connect(int socket, const struct sockaddr *address, socklen_t address_len);
int     getpeername(int socket, struct sockaddr *address, socklen_t *address_len);
int     getsockname(int socket, struct sockaddr *address, socklen_t *address_len);
int     getsockopt(int socket, int level, int option_name, void *option_value, socklen_t *option_len);
int     listen(int socket, int backlog);
ssize_t recv(int socket, void *buffer, size_t length, int flags);
ssize_t recvfrom(int socket, void *buffer, size_t length, int flags, struct sockaddr *address, socklen_t *address_len);
ssize_t recvmsg(int socket, struct msghdr *message, int flags);
ssize_t send(int socket, const void *message, size_t length, int flags);
ssize_t sendmsg(int socket, const struct msghdr *message, int flags);
ssize_t sendto(int socket, const void *message, size_t length, int flags, const struct sockaddr *dest_addr, socklen_t dest_len);
int     setsockopt(int socket, int level, int option_name, const void *option_value, socklen_t option_len);
int     shutdown(int socket, int how);
int     socket(int domain, int type, int protocol);
int     socketpair(int domain, int type, int protocol, int socket_vector[2]);


Setup Linux Network
===================
Based on Fedora 5 exprience

Setup DNS
1. add DNS IP address to file: /etc/resolv.conf; OR
2. Use GUI to enter primary, secondary DNS

Restart Network
1. Reboot; OR
2. /etc/init.d/network restart

Setup Static Routing
- for PC with external IP to connect to a Local network
1. Create a file called /etc/sysconfig/network-scripts/route-eth0
2. Enter this in the file:
      192.168.0.0/16 via 129.78.77.253
   ... where first IP range in internal network and last IP is gateway
Alternatively,  
3. Create a file called /etc/sysconfig/static-route
4. Enter this in the file:
      any net 192.168.0.0/16 gw 129.78.77.253
     
Remove Microsoft IP range
1. Edit file /etc/sysconfig/network, and put:
     NOZEROCONF=1
2. Edit files /etc/sysconfig/network-scripts/ifcfg_eth<0|1|2|...>, put:
     NOZEROCONF=1

Check Kernel IP Table:
    netstat -nr
   
Add route manually,
route add -net 192.168.0.0/16 gw 129.78.77.253 eth0
 

Remove Microsoft Routing


Network VM with Virtual Box - Bridged, Internal, Host-Only
===========================================================

This section covers the three types of networking options between Linux Guest VMs in Virtual Box, in relation to a Windows host.

I. Bridged Networking
Use Case: The Windows host (eg 192.168.1.7) and the Linux VM (eg 192.168.1.9) have independent IP, but are both belong to the same subnet network. In the usual case where the network is dynamic and the DCHP server, assigns an IP to the Windows host, it will also assign an IP to the Linux VM. Like the Windows host, the Linux VM can also connect to the outside world.

Windows Host setup: Nothing to do, if the Windows host is already connected, ie can browse the internet or ping and external IP. To check the network details, type:
   ipconfig /all
Look for the sections, either:
   i) Wireless LAN adapter Wi-Fi:
  Description ...... Qualcomm Atheros.....
   ii) Ethernet Adapter ethernet:
  Description ...... Qualcomm Atheros ....
Since there are many adapters, you need to look for the sections, using description, that relates to the physical adapters installed on your PC / laptop. The adaptes could be LAN ethernet or Wi-Fi, and the Description gives a clue if they are physical or virtual adapters.

Pick the correct physical adapter and note down the following:
IPv4 address:    eg      192.168.1.7
Subnet Mask:     usually 255.255.255.0
Default Gateway: usually 192.168.1.1

Linux Guest VM setup:
In the Virtual Box, VM settings -
- Enable Network Adapter - Check
- Attached to - Bridged Adapter
- Name: Choose your physical adapter (see Windows Host Setup above). Usually it is "... Wireless Adapter ..." or "... Ethernet Controller ..."
- Promiscuous Mode = Deny,
- Mac Address: (Write this down for later use)  eg. ...1D:9A
- Cable Conneceted - Check

Start the Linux VM,
- determine if it is eth0 or eth1 by: ifconfig -a
  WARNING: By default, configuration exist for eth0 only. But VB requires eth1,2,3,4
  So Copy the config file:
       cd /etc/sysconfig/network-scripts
       cp ifcfg-eth0 ifcfg-eth1
- edit /etc/sysconfig/network-scripts/eth1
    DEVICE = eth1   (change this as necessary)
    HWADDR=  enter the MAC address from the VM settings section above
    TYPE=Ethernet
    ....
    ONBOOT=yes
    NM_CONTROLLED=no
    BOOTPROTO=dhcp
- re-activate the interface:
   ifdown eth1
   ifup eth1
   /etc/init.d/network restart
- check by looking at: ifconfig -a
  the results for eth1 are: IP=192.168.1.9, Bcast 192.168.1.255, Mask 255.255.255.0


II. Internal Networking
Use Case: Two or more Linux VMs (eg 192.168.56.110 and 192.168.56.115) are required to communicate with each other, hence the same subnet 192.168.56.x. They are not connected to the outside world and do not communicate with the Windows host (192.168.1.7).

Windows Host setup: Nothing to setup.
Do the following only after the Linux setup is complete, and then come back to Windows to verify the following:
To check the network details, type:
   ipconfig /all
Look for the section:
  Ethernet adapter VirtualBox Host-Only Network:
  Description: VirtualBox Host-Only Ethernet Adapter.
  Physical Address: eg ... 8C:D9. Not needed to be the same from the Linux VM settings below.
  ....
  IPv4 address:    eg      192.168.56.1
  Subnet Mask:     usually 255.255.255.0

Linux Guest VM setup:
In this section, we will setup up the VM above (VM1) and a new VM (VM2) where VM1 uses eth2 to communicate with VM2 which uses eth0. The VM1 uses eth2 because its eth1 is already involved with Bridged networking.

In the Virtual Box, VM settings for both VM1 (Adapter 2 tab) and VM2 (Adapter 1 tab)
- Enable Network Adapter - Check
- Attached to - Internal Network
- Name: intnet
- Promiscuous Mode = Deny, Allow All
- Mac Address: (Write this down for later use)  ( 9F:4B,   ...77:84)
- Cable Conneceted - Check

Start the Linux VM1,
- determine if it is eth0 or eth1 by: ifconfig -a
  WARNING: By default, configuration exist for eth0 only. But VB requires eth1,2,3,4
  Since VM1 has already eth1 for bridged, the eth2 adapter will be used here.
- edit /etc/sysconfig/network-scripts/eth2
    IPADDR=192.168.56.105
    NETMASK=255.255.255.0
    DEVICE = eth2   (change this as necessary)
    HWADDR=  enter the MAC address from the VM settings section above, eg. 9F:4B
    TYPE=Ethernet
    ....
    ONBOOT=yes
    NM_CONTROLLED=no
    BOOTPROTO=static  
- re-activate the interface:
   ifdown eth2
   ifup eth2
   /etc/init.d/network restart
- check by looking at: ifconfig -a
  the results for eth1 are: IP=192.168.56.105, Bcast 192.168.56.255, Mask 255.255.255.0
- add the lines to /etc/hosts
  192.168.56.105  VM1-host  VM1-host.domain
  192.168.56.115  VM2-host  VM2-host.domain
- add the lines to /etc/sysconfig/network
  NETWORKING=yes
  HOSTNAME=VM1-host.domain

Start the Linux VM2,
- determine if it is eth0 or eth1 by: ifconfig -a
  WARNING: By default, configuration exist for eth0 only. But VB requires eth1,2,3,4
- edit /etc/sysconfig/network-scripts/eth0
    IPADDR=192.168.56.115
    NETMASK=255.255.255.0
    GATEWAY=192.168.56.100
    DEVICE = eth0   (change this as necessary)
    HWADDR=  enter the MAC address from the VM settings section above, eg. 77:84
    TYPE=Ethernet
    ....
    ONBOOT=yes
    NM_CONTROLLED=no
    BOOTPROTO=static  
- re-activate the interface:
   ifdown eth0
   ifup eth0
   /etc/init.d/network restart
- check by looking at: ifconfig -a
  the results for eth0 are: IP=192.168.56.115, Bcast 192.168.56.255, Mask 255.255.255.0
- add the lines to /etc/hosts
  192.168.56.105  VM1-host  VM1-host.domain
  192.168.56.115  VM2-host  VM2-host.domain
- add the lines to /etc/sysconfig/network
  NETWORKING=yes
  HOSTNAME=VM2-host.domain


III. Host-Only Networking
Use Case: This has features of both Bridged and Internal Networking. The Windows host is connected to the Linux VM (VM1) so that they can communicate (able to ping) with each other (like Bridged network). However the VM1 is not connected to the outside world (like internal network).
The VM1 may see the Windows host as a HOST - hence the name Host only. So the VM1 may not be able to interact with the Windows host like a peer node, but it is able to access it, such as accessing a License server on the Windows Host.

Windows Host setup: This will be using the SECOND VirtualBox Host-Only adapter because the First Host-Only Adapter has been used by the Internal networking above. Do the following only after the Linux setup is complete, and then come back to Windows to verify the following:
To check the network details, type:
   ipconfig /all
Look for the section:
  Ethernet adapter VirtualBox Host-Only Network #2:
  Description: VirtualBox Host-Only Ethernet Adapter #2.
  Physical Address: eg ... 74:F0.
  ....
  IPv4 address:    eg      192.168.39.1
  Subnet Mask:     usually 255.255.255.0

Linux Guest VM setup:
For VM1, since adapter 1 is used for Bridged, adapter 2 is used for Internal, so the adapter 3 will be used here for Host-Only networking
In the Virtual Box, VM settings for Adapter 3 -
- Enable Network Adapter - Check
- Attached to - Host-Only Adapter
- Name: VirtualBox Host-Only Ethernet Adapter #2
- Promiscuous Mode = Deny,
- Mac Address: (Write this down for later use)   eg.  ... 4A:C6
- Cable Conneceted - Check

Start the Linux VM,
- determine if it is eth0 or eth1 by: ifconfig -a
  WARNING: By default, configuration exist for eth0 only. But VB requires eth1,2,3,4
  So Copy the config file:
       cd /etc/sysconfig/network-scripts
       cp ifcfg-eth1 ifcfg-eth3
- edit /etc/sysconfig/network-scripts/eth13
    DEVICE = eth3   (change this as necessary)
    HWADDR=  enter the MAC address from the VM settings section above
    TYPE=Ethernet
    ....
    ONBOOT=yes
    NM_CONTROLLED=no
    BOOTPROTO=dhcp
- re-activate the interface:
   ifdown eth1
   ifup eth1
   /etc/init.d/network restart
- check by looking at: ifconfig -a
  the results for eth1 are: IP=192.168.39.201, Bcast 192.168.39.255, Mask 255.255.255.0
- add the lines to /etc/hosts
  192.168.39.201  VM1-host  VM1-host.domain
- add the lines to /etc/sysconfig/network
  NETWORKING=yes
  HOSTNAME=VM1-host.domain
  GATEWAY=192.168.39.1

Wednesday, September 18, 2013

PDFzilla - a Review


PDFzilla is like a swiss army knife of PDF - it does many different things with PDF files. It can convert PDF to many different file formats including Word, Excel, RTF, TXT, images (BMP, JPG, GIF), HTML, SWF and many more. In terms of PDF manipulation, it can rotate, merge, cut. This program is very useful and user friendly to manage PDF documents. Although there are other software, PDFzilla has the advantage of being easy to use and having so many functionality under one roof.

The welcome screenshot is shown below. It has all the main functionalities on display. One can very easily choose the main functions to be used. By clicking on any of the buttons, it opens up other dialogs that allow you to choose more options for the specific functionality required.


Editing is one of the most important features of PDFzilla. In many cases of usage, a PDF document is just for viewing. We may create PDF document by printing and then send to others to read. However sometimes we get a PDF and we want to modify or add new information. This is where we need a functionality to edit PDFs. This is where PDFzilla can help and is very useful to be able to edit the PDF documents. This means you can share documents with friends, and also work together by reviewing and editing each others' work.

Another important feature that PDF zilla brings is the ability to support over 20 languages. Since we are living in a globalised world, we communicate using more than one languages. Originally, PDFs may have been written for English audience. However now the whole world has got internet and is using electronic document formats such as PDFs, it is very important for PDF to be able to recognize many languages around the world. PDFzilla can do that very well. It renders German, French, Spanish, Italian and all the Unicode languages.

Another wonderful set of features in PDFzilla is the ability to manipulate files in PDF format. This include the ability to merge, cut and rotate PDF files. Sometimes we may get a collection of many one-page PDF documents but they are of the same topice. Hence we can use the very useful feature of PDF merge in PDFzilla to do the merging. Then sometimes we scan pictures into PDF documents and they are scanned sideways. This is when we can use the rotate feature of PDFzilla to rotate the PDF documents.

Disclaimer: This is a paid review. Review writers of PDFzilla get a free copy of PDFzilla. Thanks!

PDFzilla official site

Saturday, August 24, 2013

Windows 8

Here's a collection of links, notes and information on Windows 8 on the topic of recovery, creation of recovery DVDs, USBs and so on.

How to get System Properties?
- Go to the desktop
- Click on the Windows Explorer file manager icon.
- In Windows Explorer, right-click on the Computer icon and choose Properties.
- Information displayed include:
Windows 8  Product ID
Processor (CPU)
Memory
Computer Name
Workgroup

How to Open Charms
- Windows + C

How to get into BIOS
- For Toshiba P70, when PC is restarting, press F2

How to delete a wifi profile?
- In the Command Prompt, type:
   netsh wlan delete profile name="network_name"

How to Connect to a Hidden Wireless Wifi.
- On the Task Bar, right click on the network icon and select: Open Network and Sharing Center.
- Click on: Set up a new connection or network
- Choose: Manually connect to a wireless network
- A dialog box appears, fill in the following:
    Network name: the router's name that you set
    Security Type: eg Personal WPA2
    Encryption Type: AES
    Security Key:  the one set on the router
    Check: Start this connection automatically
    Check: Connect even if the network is not broadcasting (Need to ignore the warning about privacy issue). If this is not checked, then hidden SSID networks cannot be connected automatically)


Windows 8 Recovery

Search - Apps: " Recovery"
- Recovery Media Centre
Search -Settings: "Recovery"
- Refresh Your PC
- Remove everyhting and reinstall Windows


How to Create Factory Recovery USB Flash
- go to Charms
- Search for: recovery
- Run: Create a recovery drive
- Uncheck "Copy the recovery partitions from the PC to the recovery drive (512MB required)
- If Check the above options, USB needs to be 32GB at least.


How to use Factory Recovery USB Flash
- This assumes the recovery partitions are not copied. So this USB can only use to fix the system, or recover if the recovery partitions are still on the PC.
- Restart Computer and change BIOS (press f8) to boot from USB first.
- Restart Computer and follow instructions.
- Select Language, then Keyboard, then choose "Use a device". The options are:
   EFI USB Device
   EFI Network
   EFI DVD/CDROM
- Choose TroubleShoot, which has this options:
   Refresh Your PC
   Rest Your PC
   Recovery Tool
   Advanced Options
- In Advanced Options, there are:
   System Restore,
   System Image Recovery,
   Automatic Repair,
   Command Prompt,
   UEFI settings
- "Choose EFI USB Device"


Links:

How Do I Use Windows 8 Recovery Disc?
http://www.tomshardware.com/faq/id-1653296/windows-recovery-disc.html
- Vendors may ship for free the Windows 8 recovery discs.

Create installation disc (DVD) for new laptop. Windows 8
http://www.tomshardware.com/forum/1755-73-create-installation-disc-laptop-windows

Windows 8 Tip: Create Recovery Media
http://winsupersite.com/article/windows8/windows-8-tip-create-recovery-media-144098

Factory Recovery Media
http://www.eightforums.com/installation-setup/22219-factory-recovery-media.html

How to Create a Recovery USB Flash Drive in Windows 8
http://www.eightforums.com/tutorials/5132-recovery-drive-create-usb-flash-drive-windows-8-a.html

Official Toshiba site: I’ve lost my Recovery Discs or didn’t have any in the box when I purchased my computer.
http://www.mytoshiba.com.au/support/item/69